Here is a guide on some useful Tips and Tricks on Windows 11 File Explorer that you must know. The File Explorer in Windows 11 has been redesigned and it has some new features. It has a new context menu, revamped ribbon, and more new features. To utilize all of its features to the fullest, you can check out these tips and tricks that we have mentioned in this post. Let us check out.

How do I open Folder Options in Windows 11?
To open up File Explorer Options (earlier called Folder Options) in Windows 11, click on the three-dot menu button from the main ribbon. You will see Options; simply click on it and it will open up the File Explorer Options window.
Best Windows 11 File Explorer Tips and Tricks
Here are some tips and tricks to help you get the best out of Windows 11 File Explorer. Start using Explorer as a power user!
- Customize the Target Folder for File Explorer.
- Show Recycle Bin in the Sidebar.
- Customize Folder Layout.
- Remove Recent Files History.
- Customize Folder Thumbnail.
- Show Preview Pane.
- Share Files directly from File Explorer.
- Bulk Rename Files in File Explorer.
- Add or Remove Folders From Quick Access.
- Bulk Rotate Images from File Explorer.
- Create new files of different file types.
- Open files with the right app.
- Quickly edit file metadata in File Explorer.
- Some useful keyboard shortcuts/ hotkeys for File Explorer.
1] Customize the Target Folder for File Explorer
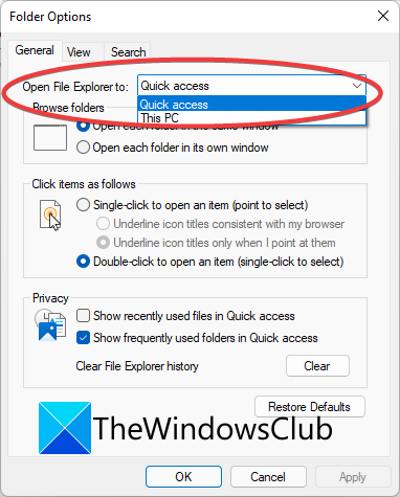
You can choose what you want to open whenever you launch File Explorer, This PC or Quick Access. By default, the Quick Access panel with selected folders is shown when you open File Explorer. If you want, you can change the target folder to This PC if that is what you prefer. To do that, here are the steps you can follow:
- Firstly, open the File Explorer and then click on the three-dot menu option present on the ribbon.
- Next, click on Options to open up the Folder Options dialog window.
- Now, from the General tab, select Open File Explorer to as This PC.
- Finally, press the Apply > OK button to save changes.
Now, whenever you open File Explorer, This PC panel will show up. In case you decide to change the settings later, you can use the same steps as discussed above.
Read: How to use the new Windows 11 Explorer.
2] Show Recycle Bin in the Sidebar
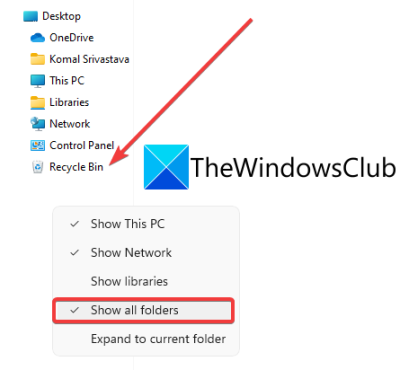
By default, Recycle Bin is hidden in the File Explorer. If you want to view Recycle Bin folder on the sidebar in File Explorer, you can do that. To do that, simply right-click anywhere on the empty portion of the sidebar in the File Explorer. You will get some options in the context menu including a Show all folders option. Just tap on this option and you will see various folders including Recycle Bin. It also displays Control Panel, Libraries, and other significant folders.
TIP: You can also display Recycle Bin in This PC folder or pin it to Quick Access.
3] Customize Folder Layout
Microsoft has worked on redesigning the look and feel of Windows 11. The File Explorer is also redesigned and you can see significant changes in its appearance as compared to Windows 10 and previous builds.
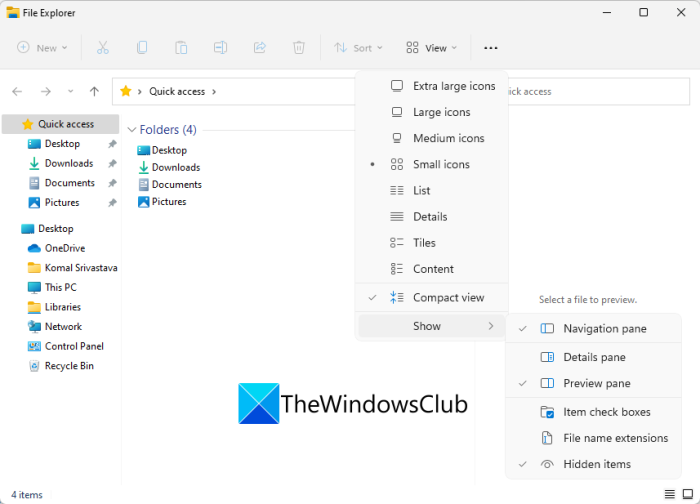
You can customize the default appearance of files and folders by changing their layout. There are several view options to change folder layout in Windows 11’s File Explorer. You can change the folder layout to tiles, list, icons, details, content, and more. You can also enable the Compact View option to decrease space between items. Furthermore, you can sort and group items by different parameters like total size, file system, type, and more.
4] Remove Recent Files History
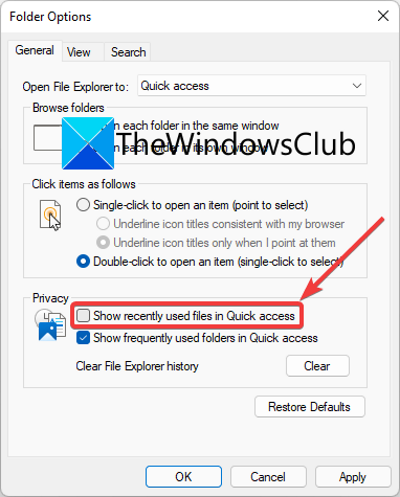
Fiel Explorer display recently accessed files by default. If you don’t want to see recently accessed items, you can choose to remove recent files from File Explorer. For that, just click on the three-dot menu option from the toolbar and select Options. In the Folder Options window, uncheck the option called Show recently used files in Quick Access present under the Privacy section. Then, press Apply > OK button to apply changes. You won’t see recently used files in File Explorer now.
5] Customize Folder Thumbnail
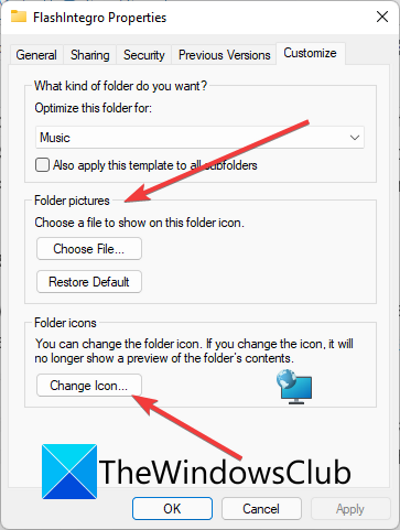
Windows 11 File Explorer has some nice folder icons/ thumbnails set by default. However, you can change them to your favorite icons and completely customize thumbnails for individual folders and files. Here are the steps you can use for that:
- Right-click on the folder for which you want to customize the thumbnail.
- Click on the Properties option and navigate to the Customize tab.
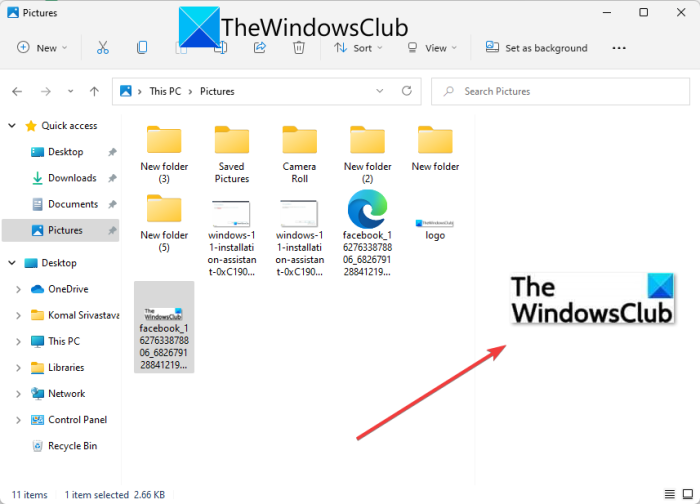
- You can now select the icon file that you want to show on the thumbnail of the folder.
It also provided various standard folder icons to use to choose from.
Read: How to disable the File Explorer Command Bar in Windows 11
6] Show Preview Pane
Preview Pane is a good feature when you want to preview a file before opening a file. It enables you to check out file content right from File Explorer. To enable file preview, go to the View option and then click on the Show and enable Preview pane. Now, you will see a dedicated preview pane on the right side in the File Explorer.
In case you change your mind and want to hide the preview pane, go to View > Show and disable the preview pane.
7] Share Files directly from File Explorer
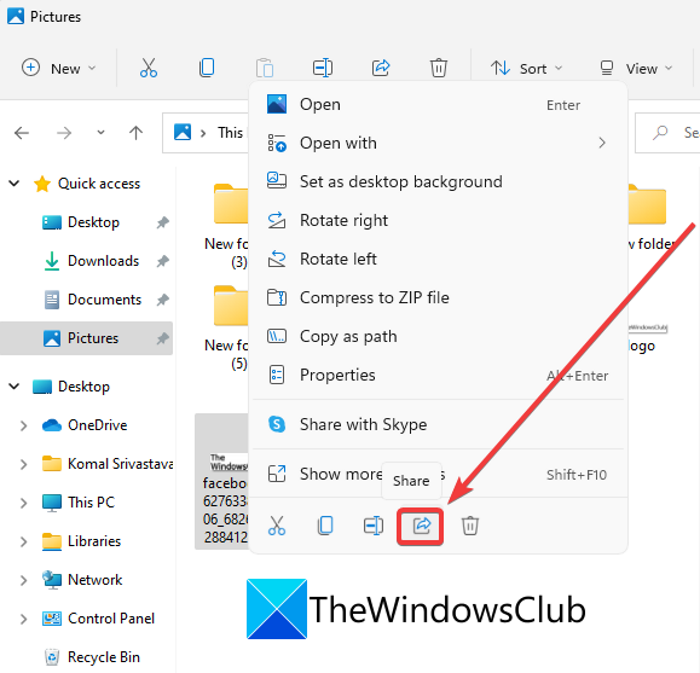
You can share your files and folder directly from File Explorer via installed Windows 11 apps. To do that, you can follow the below steps:
- Right-click on the file you want to share.
- From the context menu, select the Share option (highlighted in the above screenshot).
- You can now select Email or some other Windows app to share your file.
TIP: How to get Old Right-click Context Menu back on Windows 11.
8] Bulk Rename Files in File Explorer
If you want to rename multiple files at once, you can do that right from File Explorer. Windows will rename selected files with the name you choose with a suffix. Select multiple files and then click on the Rename option. Then provide a name and press Enter. All files will be named with the same filename with a suffix.
In case you want to rename files with a different name, you can select the first file, click on the Rename option, and enter the filename. Then, press the TAB button on your keyboard and the next file will be in rename mode. You can now enter the name for the second file and then press TAB and continue renaming the next file. Repeat the process for all files and you will be able to rename multiple files in one go.
Read: How to decrease the space between the items in Windows 11 Explorer
9] Add or Remove Folders From Quick Access
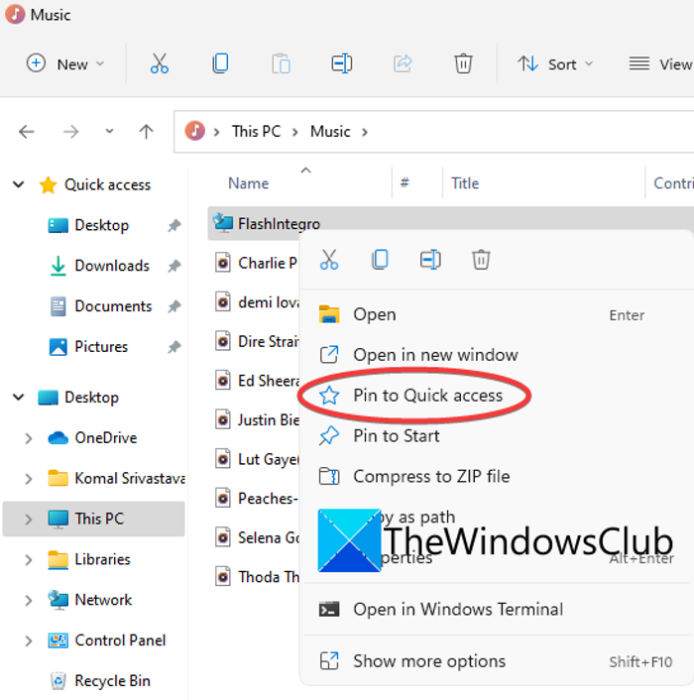
You can also add your favorite folders that you frequently visit to the Quick Access panel in File Explorer. This gives you easy access to important folders. To do that, you just have to right-click on the target folder, and then from the context menu, press the Pin to Quick Access option.
In a similar manner, you can remove a folder from Quick Access if you want. Just go to the Quick Access panel, right-click on the folder, and tap on the Unpin from Quick Access option.
10] Bulk Rotate Images from File Explorer
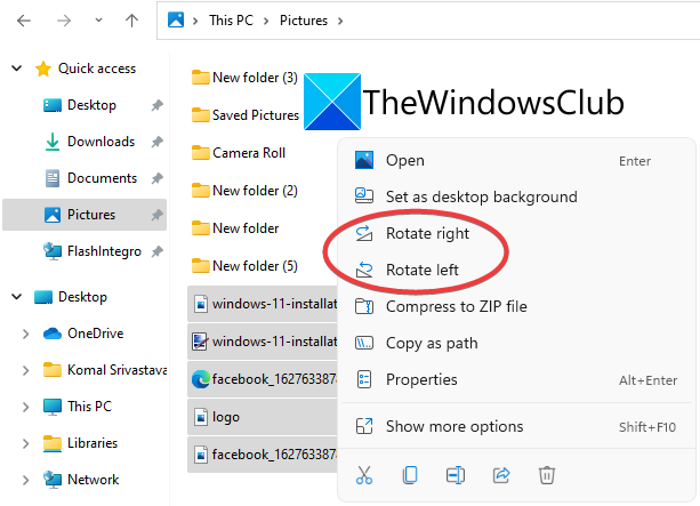
Want to quickly rotate multiple images right from File Explorer? You can do that too. For doing that, you need to select multiple image files and right-click on them. Then, from the context menu, select either Rotate Left or Rotate Right option to bulk rotate images.
11] Create new files of different file types
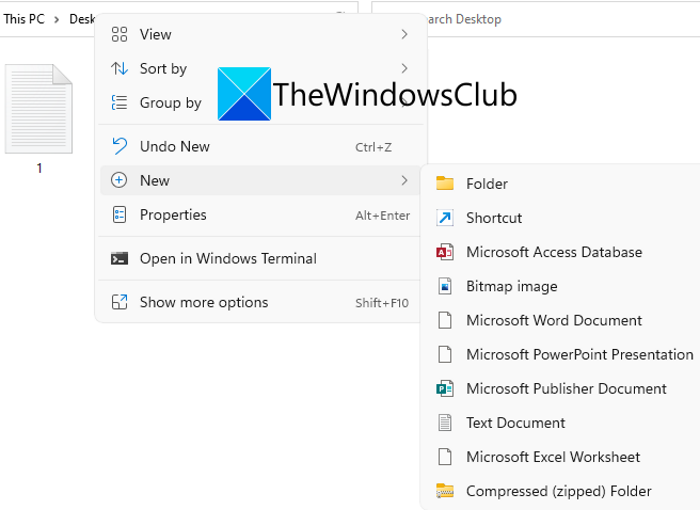
You can also create new files of multiple types in File Explorer. File Explorer in the new Windows 11 now lets you create a new file from the right-click context menu. You can create Text, Bitmap image, Microsoft Publisher, Microsoft Word Document, Microsoft PowerPoint Presentation, and more files in File Explorer.
Here are the steps to create a new file:
- Open File Explorer and go to the folder where you want to create a new file.
- Right-click on the empty space and then go to the New option.
- Select the file you want to create.
- Enter the filename.
Read: Windows 11 Settings you should change right away.
12] Open files with the right app
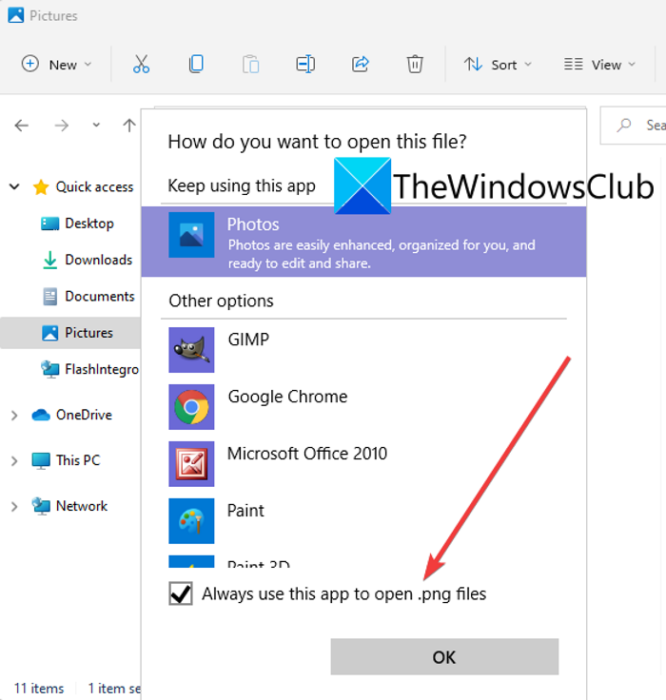
Make sure you open files with the correct application. To open a particular type of file with a specific app, right-click on the file and then go to the Open with > Choose another app option. Now, tap on the application with which you want to open a file and then enable the checkbox called Always use this app. Finally, press the OK button. Now, whenever you will open the file, it will open up in the selected app by default.
13] Quickly edit file metadata in File Explorer
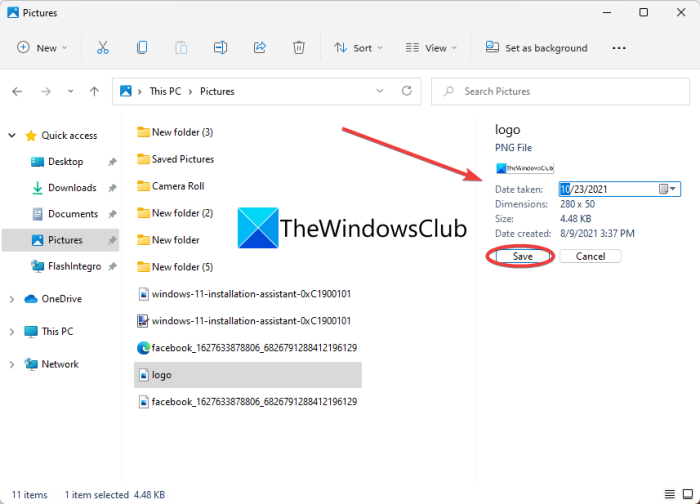
You can also edit the metadata of files right in File Explorer. To do that, select the file and then press Shift+Alt+P to open up the detail pane on the right-hand side. Now, select a metadata field and enter its value. Finally, click on the Save button to save the new file metadata.
14] Some useful keyboard shortcuts/ hotkeys for File Explorer
There are several keyboard shortcut keys to perform a particular action in File Explorer. Here are some of the hotkeys you might find useful:
- Ctrl+N – To open a new File Explorer window.
- Ctrl+W – To exit the current File Explorer window.
- Ctrl+Shift+N – To create a new folder.
- Backspace – Go back to the previous folder.
- Ctrl+F – To select the search box.
- Ctrl+L – To select the address bar.
You can check out the guide for some more File Explorer shortcut keys.
That’s it!
How can I make File Explorer better in Windows 11?
All these tips that we have shared in this post are intended to help you make File Explorer experience better. You can use these tricks as per your preference and improve your experience of managing files and folders.
Now read: Windows 11 Tips and Tricks.

"explorer" - Google News
October 25, 2021 at 10:16PM
https://ift.tt/3pB6oRD
Best Windows 11 File Explorer Tips and Tricks - TWCN Tech News
"explorer" - Google News
https://ift.tt/2zIjLrm
Bagikan Berita Ini



0 Response to "Best Windows 11 File Explorer Tips and Tricks - TWCN Tech News"
Post a Comment